![]() If anyone Knows me…They know I’m a chocolate lover!I preferably LOVE dark chocolate because it’s not too overly sweet. These Dark & Creamy Double Fudge Cupcakes with a semi-sweet dark chocolate frosting (Frosting For Dark & Creamy Double Fudge Chocolate Cupcakes) topped with rich white milk chocolate spider webs are a perfect combination because it’s not overly sweet, but as Goldie Locks says “Just Right”!!!
If anyone Knows me…They know I’m a chocolate lover!I preferably LOVE dark chocolate because it’s not too overly sweet. These Dark & Creamy Double Fudge Cupcakes with a semi-sweet dark chocolate frosting (Frosting For Dark & Creamy Double Fudge Chocolate Cupcakes) topped with rich white milk chocolate spider webs are a perfect combination because it’s not overly sweet, but as Goldie Locks says “Just Right”!!!
I thought these Dark & Creamy Double Fudge Cupcakes were a perfect fit for my sons Holiday Festival! I made 78 of these beauties! I know kinda overkill, but I tend to over-do everything when it comes to the art of parties and cakes!
![]()
Once you make the cupcakes and put them into your chosen cupcake liner (I simply found these at the 99 cent store! So it doesn’t have to cost you a fortune for it to look cute), then we can top them with your frosting tip of choice!
![]()
I used a Wilton # 1A tip for these cupcakes, which is just about as big as you can get!
![]()
So next while I waited for my cupcakes to firm up a little bit in the fridge, I went on to making the chocolate webs! You need a package of white milk chocolate candy melts (regular chocolate won’t work and melt correctly), one piping bag, tip adapter (make it easy to reheat if needed because you can remove the metal tip), Wilton tip #4, parchment paper and a spider web stencil (Spider Webs).
![]()
Firstly, you need to melt the white Chocolate in the microwave. Put your tip adapter in the piping bag (do not cut tip open yet!) and add you white chocolate. I used a tall coffee cup to put my bag into so the chocolate would spill out the open end as I was heating up the chocolate slowly.
![]()
I placed the bag in the cup and microwaved it (30 sec at a time) and mixed it around with my hand as I went along.
![]()
Once Melted evenly, you can begin to pipe out your milk chocolate over your web stencil on the parchment paper so it doesn’t stick.
![]()
You will slowly get better at it as you do more, but be sure not to squeeze the piping bag too hard because when the chocolate is fully melted it can come out quite fast. It’s a nice happy medium between too much pressure and not enough pressure. I liked to make some whole webs and partial webs to change it up!
![]()
![]()
Good Luck!
And it’s important to have fun… so remember to have fun with it!

 Isn’t this cake simply breathtakingly elegant! I almost don’t want to ever eat it and, let’s face it, it’s stunning! – Honestly, though, where’s the fun in that? I’m a cake lover (and eater), so tasting this beauty is a must!
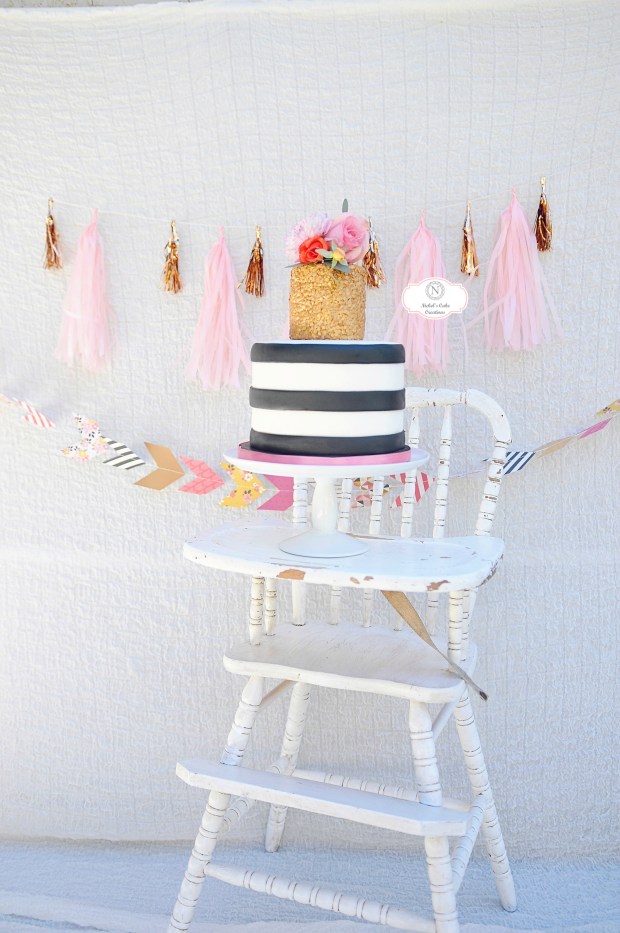
 Photo Credit to Tiffany Nicole Photography
 So a little while back I had the pleasure of doing the cakes for Monika’s daughters first birthday! I constructed an elegant striped cake with gold confetti for her Floral Minnie Mouse Party! LOVED this cake with the gorgeous gold confetti look. It was a newer technique that I hadn’t done very much BUT love the fresh, classy, clean and contour look of it. This two tiered cake was companied by a buttercream rosette smash cake. Follow me as I take you through some of the steps.
 Till next time!